
DWC For Tomatoes
Hi, are you interested in growing tomatoes? Getting year after year consistent results?
I am and I would like to share with you my method of DWC for tomatoes.
This system may not be the best but it does give repeatable and reliable results.
So – how do I do DWC for tomatoes?

This method started about 10 years ago with me, I had heard of hydroponics but always shied away thinking it was very hard. You had to be a chemist or scientist to know what you were doing. The equipment you needed was expensive. The systems you used were difficult to use.
After taking the plunge years ago I can tell you that I have had excellent results when others had had lousy returns.
Is the system I use difficult – no.
Is it time consuming to maintain– no.
Is it expensive to run – no.
what do I do?
Essentially I dip tomato roots in nutrient ( liquid soil) and wait for the tomatoes to grow!!
That’s it. Sorry – no exotic techniques here. Very, very simple ones which work.
Let me now describe how you can also make this system.
What do you need?
An electric supply, make sure that it is installed by a qualified electrician. You will need two sockets, one for an air pump and the other for a heater.
So from the above you can see you need an air pump, along with a couple of air stones.
You don’t strictly need the heater, but if you start the tomatoes off early in the year then the nutrient may be cold and require warming to allow optimum take up.
A container for the nutrient, I use a 25l storage container, with a lid. The outside is wrapped with silage film (you what?). Well to prevent the UV from the sun breaking down the plastic of the container I protect it with the silage film. This also has the advantage of stopping the sun causing an algae bloom in your nutrient tank. The bloom would use up some of the nutrients and start to smother the roots not allowing the tomatoes to grow properly.
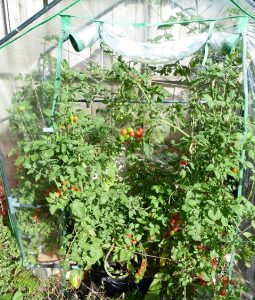
A cover for the system, I use a 4-tier greenhouse with out the shelves. This affords the system enough light for the plants to grow, but gives enough protection form the rain to prevent dilution of the nutrient. I think the plant like the fact that they are sheltered from the worst of the wind.
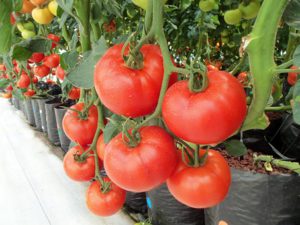
To grow the tomatoes I use 80mm mesh pots. you can use standard pots, but I would advise adding a few holes in the sides to allow circulation of air and nutrient.
To hold the tomatoes upright in the pots there are clay pebbles. You don’t need masses of these and they are sold in garden centres for aeration of the soil. They are reusable as the roots don’t grow into them just around them. They hold a lot of moisture and allow plenty of air to circulate around the roots.
Another requirement is nutrient. Unfortunately this is not the sort of stuff you use for house plants, this does not contain all of the vital elements the plants need to grow. This is where a little of the chemist/scientist comes in (you don’t need to become one). Plants need different combinations of elements at different stages of growth. Just like people. So manufacturers have different quantities of elements mixed together for the different stages of growth.
You don’t need to get into what is required if you don’t want to, but you can if you want.
A lot of nutrient manufacturers sell nutrients for vegetation growth along with the flower and fruit stages.
I tend to use two different types and it seems to work very well.
For the initial stages I use Canna Vega – a two part nutrient which you mix into the water. It makes it easier for the manufacturer to keep the elements apart as some don’t mix well if kept together in concentration.
When the flowers start appearing I change over to Canna Flora – specifically formulated for flowering plants. I stay with this until the end.
A Little Diversion
I didn’t know that tomatoes can be kept in a warm climate for up to four years. So growing these indoors and keeping them warm would give you fresh tomatoes year round for up to four years from one plant. I presume you would trim the main stem and use side shoots to keep giving you new fruit – I will have to try it.
Back to it
Well that’s all you need – it may seem a lot but it really isn’t. The main pain for a lot of people is the electric supply. It may be possible to run a low voltage air pump from a battery which you swap over and recharge, I haven’t tried this but I am sure it could be done. You don’t need too much air going through the system.
Oh you will need a couple of buckets for water and a water pump to help you change the nutrient – not essential but I found it works well.
So the list so far
1 x storage container with lid – 25l or larger ( for four plants)
1 X silage film
1 x heater – aquarium heater 100w
1 x air pump – hailea aco 9602 5w 7.2l/min twin output
2 x round air stone -100mm diameter larger surface area
air tube to connect stones to pump
1 x four tier greenhouse
4 x 80mm mesh pots
5l clay balls
1l x canna vega – enough for a couple of seasons
1l x canna flora – enough for a couple of seasons
2 x buckets for water storage to bring it up to temperature and release the chlorine.
1 x water pump – hailea hx800 285 l/hr to make changing the nutrient easy.
2m x pipe – 12mm internal diameter to suit water pump
Don’t worry there is a pdf at the bottom if you don’t want to write it down.
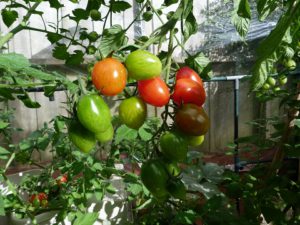
So onto the tomatoes themselves
How do you select a tomato you will like?
With over 700 available how on earth do you decide?
With the system you are going to build maybe you can ask around and see what people are eating, ask them to save some of the seeds.
How do you save the seeds? All I do is to place them on some kitchen paper and allow them to dry out. Label them up and use them within a couple of years. The other way I do it is to use them wet, straight from the tomato into a little compost to start them off.
I will go into the supermarkets and look at the different tomatoes and try them at least once. This way you can see if you like them, save some seeds – you can always throw them away if you don’t like them.
Can you guarantee this process – no, with F1 hybrid varieties the next generation will not be the same as this generation. Although as these are more expensive I cannot see supermarkets using them.
I don’t pay any more for specialist seeds – I tried this one year for a yellow tomato and didn’t like the taste or texture. I have tried moneymakers and found the taste weak and watery. Over the last few years I have grown a salad tomato, small, almost plum like but full of flavour.
So, no you don’t have to pay for seeds, the next time you cut open a tomato, if you like it save a few of the seeds, and grow them in this system. You have a better chance of liking them than if you buy an unknown variety.
How to construct the system.
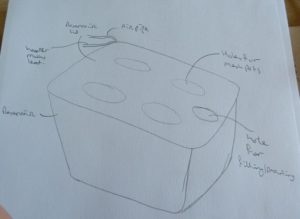
You will need to create some holes in the top of the nutrient reservoir. Measure the top of the mesh pot just below the top lip. I used an expandable hole cutter – with some success, the plastic used for storage containers is fairly brittle and can breakout if you press too hard with the drill. Use a slow speed drill and put a backing on it to support it.
You could alternatively use a knife carefully to cut the holes.
Don’t forget to add a hole for the filling of the reservoir. Make it large enough to fit the water pump.
Connect the air stones to the air pipe. Cut a slot in the corner of the reservoir to accommodate both this and the heater cable once the lid is placed on it.
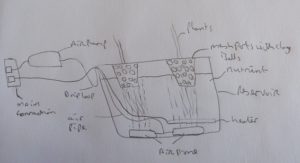
Run the air pipe to the air pump. Ensure that you have a drip loop or add a non return valve to prevent the water, if it goes up the pipe, from getting into the air pump.
It is useful to test the system with water to see how the air stones work along with the heater – note never run the heater when it is out of the water, it will overheat and stop working.
Once the lid is on that is the system set up. Not too much to it.
You can practice emptying and refilling – I used to use a hand pump to empty then struggle to refill until I developed this system.
Emptying the nutrient
unplug the heater.
Place the tubing on the output of the water pump.
place the end of the pipe into an empty bucket.
Put the pump through the hole in the reservoir cut out for the pump.
Try to push it down to the bottom.
Plug in the pump and switch on
the ‘nutrient’ or water in this case will be pumped out.
Once it is trying to pump air turn off the pump.
That’s it.
If it is nutrient then use this to water other house plants you have or water the garden plants.
Refilling the system.
Fill a bucket with nutrient ( or water to practice)
leave overnight or for a few hours to allow the temperature to come up to ambient and the chlorine to evaporate. ( update – now they use chloramine this no longer applies)
Put the water pump into the bucket at the bottom
Place the pipe into the nutrient reservoir and switch on the pump.
The water should transfer across easily.
Switch off the pump
And that’s it
A lot of hydroponic experts would say you need to check your ph level and your ec.
I have in the past and recorded it, adjusted it up and down when
necessary and the tomatoes grew with the manufacturers recommended dilution. So to start with I would just go with that. Don’t worry about the ph or the ec or ppm.
All you need to do now is to start growing your tomatoes in the spring, indoors or outdoors the choice is yours. Plant the seedlings up in the pots and fill the pots with the clay balls.
When starting to grow the tomatoes, adjust the nutrient level to be about ¾ the way up the pots. This will give the new seedlings roots a chance to grow into the nutrient.
As the tomatoes get older the root mass will expand into the bottom of the reservoir. And as the soil grown cousins do, drink a whole heap of nutrient. remember to check on them once a day.
Don’t forget to support the stems as they grow and dependent on the variety, the fruits.
But do enjoy the fruits of your labour.
To clean up at the end of the season.
Switch off every thing.
Carefully remove the mesh pots from the top of the reservoir.
Trim off any roots outside the pot.
Pull out the plant from the pot and remove the clay balls from the root mass.
These can be washed and reused or dug into the soil as a soil improver.
The mesh pots can be washed and reused .
The air pump may last a few seasons, the rubber diaphragms suffer breakage. So make sure these are working properly at the start of the season and keep a spare diaphragm or two in just in case.
Wipe down the heater.
Dry out the reservoir.
Wait for next year!!
Don’t want to make it yourself but want to try it
Systems
Nutrients
equipment
Have you decided to try it?
If you do decide to try out DWC for tomatoes please come back and tell us about your adventure. Did it work? Was it a lot of hassle? Are you a convert? Will you do it again? What have I missed?
Here’s the pdf for the DWC for tomatoes.
Many thanks for reading
Good luck with your ventures
Phil
great effort, BUT… suggesting to pay no attention to ph or ppm/eq is fine if your water supply is at a naturally compatible ph. However not everybody has that. My supply is ph neutral with ppm about 87, while my buddys ph is alkaline and his ppm is over 300 already, so to avoid any possible nutrient lockout he has a lot more adjusting to do than I. Just saying , peace
Gregg, thanks for stopping by and reading the article.
The vast majority of drinknig water will be compaable with use for hydroponics.
I will admit that if you live in a hard water area then you may need to use a different type of nutrient than in a stndard area, but you will still be able to grow plants.
To start talking about ph or ppm to someone who wants to ‘just grow tomatoes’ would really put them off, so to get started with a DWC system for tomatoes then you will be able to follow the system I have used successfully for years.
This year (2018) has been exceptional for my tomatoes and I will probably be eating them until Christmas.
I will be doing articles on ph and ec to check that your plants will be very happy with the nutrient.
So I would say if you don’t think your water tastes funny or you don’t suffer from scale too much, your water is fine to use without testing.
if you suffer from scale or it tastes funny them it is worth testing and if necessary adjusting.
The problem with your friends water at a ppm of over 300 is that you really don’t know why, so a water analysis from the water supply board – or an independant test lab will show why it is so high. And then they can adjust the levels of nutrients or use reverse osmosis purified water.
What i would say is to try it – if you can’t grow or you have trouble then start testing, but keep it simple to start.
I hope you are having lots of success.